Mastering Carnations: A Comprehensive Watercolor Tutorial
Embarking on a journey into the world of watercolor painting? Eager to master the art of creating vibrant, captivating carnations? You've come to the right place. This comprehensive tutorial will guide you through the process, ensuring your blooms are as radiant as they are intricate.
Watercolor, with its unique ability to create luminous, ephemeral effects, is the perfect medium for capturing the essence of carnations. Their delicate petals and varied hues provide ample opportunity for experimentation with color and technique.
Gathering Your Materials
Before you begin, ensure you have the right tools. High-quality watercolor paints, a smooth surface such as cold-pressed watercolor paper, a paintbrush set with both round and flat synthetic or natural bristles, water containers, paper towels, and masking tape are essential.
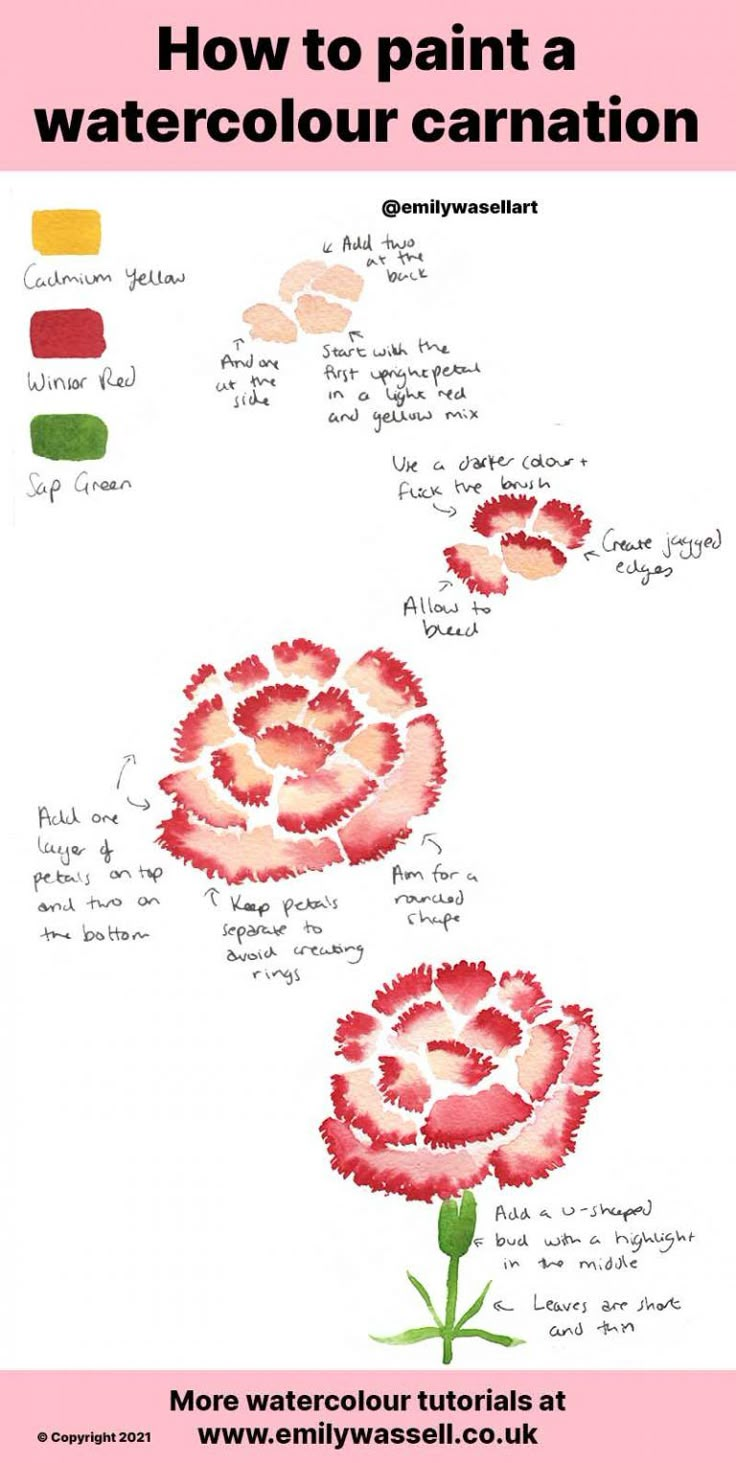


For this tutorial, we'll focus on using Daniel Smith's watercolor palette for its wide range of colors. You'll need Lemon Yellow, Permanent Alizarin Crimson, Dioxazine Purple, Sap Green, and a touch of Neutral Tint for darker shades.
Understanding Color Mixing
Familiarize yourself with color theory. Carnations typically have pink to red petals with green parts. You'll create these hues by mixing Permanent Alizarin Crimson, Dioxazine Purple, and a bit of Lemon Yellow. Test these mixtures on a scrap paper to find the exact shades you need.


Remember, watercolors are translucent. Layers of color mixed carefully will give you the most realistic results. Don't be afraid to experiment, but also practice restraint - overworking the painting can lead to muddy colors and loss of vibrancy.
Preparing Your Paper
Masking tape your paper to a board to ensure it remains taut and prevents warping. This also makes it easier to work on corners and edges. Draw your carnation(s) lightly using a pencil. Keep the design simple, focusing on shape and proportion rather than intricate details.
Once satisfied with your drawing, you're ready to start painting. Review your color mixes and keep your palette organized to avoid confusion.


Creating the Carnations
Start by painting the carnation's center. Using a size 8 round brush and a mixture of Permanent Alizarin Crimson and Dioxazine Purple, create a circular base. While the center is still wet, add touches of lighter colors to create a natural gradation. Blend with a clean, damp brush if needed.
Next, move onto the petals. Start with the lighter shades, gradually building up to darker hues. Use a size 4 round brush for precise work. Wet-on-wet technique works well here, allowing colors to blend naturally. Add veins and textures using a touch of Neutral Tint and a fine brush。
Adding Leaves
Switch to a flat brush for painting the leaves. Use Sap Green mixed with a bit of Neutral Tint. Create a base color, then add lighter and darker greens for shading and highlights. Make sure to paint the leaves with varied shapes and sizes to give them a natural, organic appearance.
Once the main colors are dry, you can go back in with a detail brush to add more intricate lines and textures. Remember, less is more. Carnations are beautiful in their simplicity - don't overcrowd your painting with unnecessary details.
Allow your painting to dry completely before removing the masking tape. Sign your artwork and display it prominently - you've earned it!
Now that you've mastered painting carnations, why not try other flowers? Experiment with different colors and techniques to find your unique watercolor style. Happy painting!
Related Articles

Mastering Watercolor: A Comprehensive Guide
Watercolor painting is a captivating and versatile art form that offers endless possibilities for creativity and self-expression. With its unique ability to...

Mastering Fluid Motion: A Watercolor Ballerina Drawing Tutorial
Revel in the grace of a ballerina captured in the soft, delicate hues of watercolor. This enchanting art form beautifully blends dance, art, and storytelling...

"Mastering the Wolf Cut: Step-by-Step Drawing Tutorial"
The wolf cut, a striking hairstyle that's taken the internet by storm, is a bold fusion of modern and classic styling. It's a unique blend of a shag and a...

Mastering Hair Dye: A Comprehensive Guide
From the delicate hues of a pastel sunrise to the vibrant tones of a painter's palette, the world of dyeing is an art that's been captivating artisans...

Mastering the Skull: Step-by-Step Pencil Drawing Tutorial
Ever felt intrigued by the mysteries of life encapsulated in the human skull? Drawing one can be an eerily fascinating and rewarding experience. With just a...

Mastering Chameleon Coloration: A Comprehensive Guide
Ever wondered if it's possible to change the vibrant colors of your pet chameleon? Although their natural color-shifting ability is fascinating, some...