Mastering Bison Drawing: Step-by-Step Guide
Embarking on a journey to draw a bison? A majestic American landscape staple, this mighty creature can be both challenging and rewarding to illustrate. In this step-by-step guide, we'll navigate the process from initial sketch to final product. So, grab your pencils and paper, and let's dive in!
The bison, often mistakenly called a buffalo, is a formidable subject with its massive form and distinctive hump. But with patience and practice, anyone can capture its essence. Here, we'll be using a basic sketching approach, perfect for beginners and experienced artists alike.
Understanding Bison Anatomy
Before we begin, let's familiarize ourselves with the bison's key features. This will help us create a more accurate and dynamic drawing. The bison has a large, humped shoulder, a wide forehead, and a thick beard. Its legs are short and stocky, providing powerful support for its considerable size.


Knowing these features will help us establish the basic proportions and structure of our drawing. So, let's start with a simple line sketch to capture these fundamentals.
Starting with a Basic Sketch
Begin by sketching a large oval for the bison's body. This will serve as our basic foundation. From this oval, sketch in the hump, the neck, and the head, using smaller ovals and circles. Don't worry about making it perfect at this stage; we're just setting up our basic proportions.


Next, add simple lines for the legs. Remember, bison are low to the ground, so your leg lines should be short. Finally, add a small circle for the eye. This will help us maintain the bison's expressive poses as we refine our sketch.
Refining Our Sketch
Once we have our basic sketch, we can start refining the shapes. Use cross-hatching to add detail and depth to the hump and the neck. Remember, the hump is not a perfect shape; it's uneven and muscular. Try to capture this dynamic quality in your lines.
Next, move on to the head. The bison's forehead is wide and sloping, giving it a unique, imposing profile. Use this as a guide to refine your initial circle. Add the beard, using short, scruffy lines to mimic the beast's coarse hair. Finally, refine the eye, adding depth and spark with expressive shading.


Developing Our Drawing
Now that we have our basic sketch refined, it's time to start developing our drawing. This is where we add value and dimension to our initial lines.
Start by outlining your sketch with a pen or marker. This will give your drawing a bold, cohesive look. Next, begin adding shading. Bison are typically dark in color, so use a mix of cool and warm grays to create depth and contrast.
Shading Techniques
Shading is what brings our drawing to life, so take your time with this stage. For the hump and neck, use a combination of smooth, horizontal strokes and heavier, textured marks to mimic the feel of fur. Remember, light travels around the bison's body, casting shadows and creating highlights.
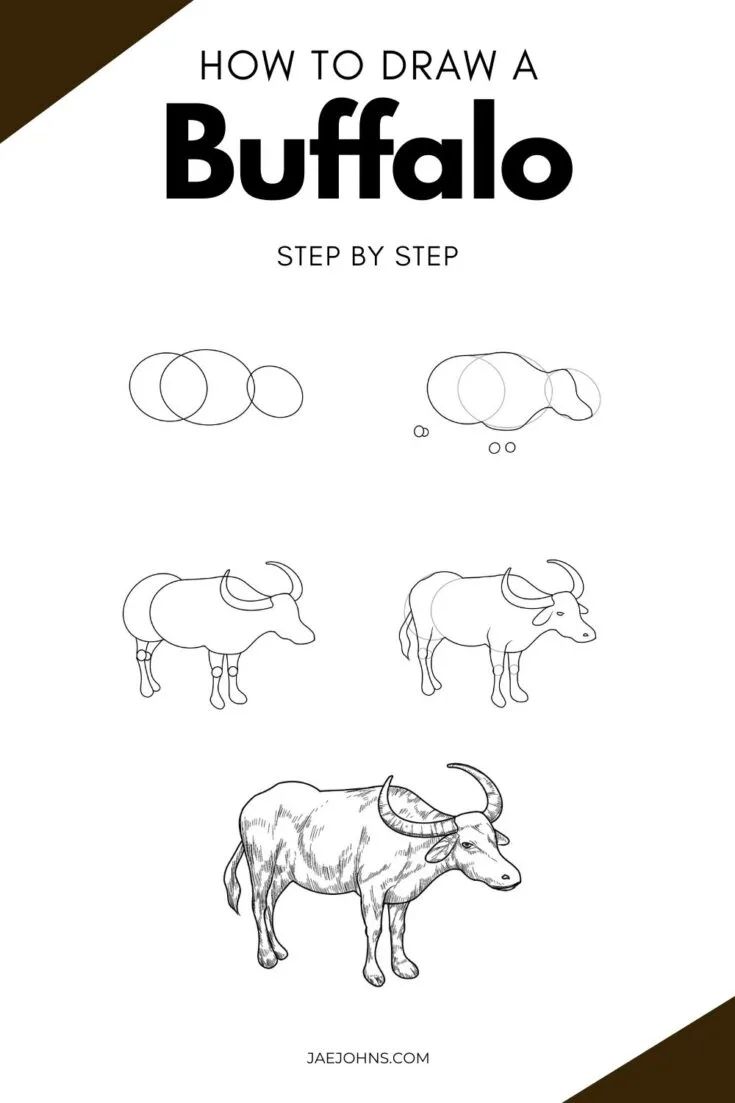


For the beard and the legs, use heavier, textured shading. These areas are dense with hair, so our lines should reflect this. Again, consider where the light source is coming from and how it interacts with the bison's body.
Finishing Touches
With our shading in place, it's time to add the finishing touches. This is where we enhance the detail and bring our drawing to life.
Use a thin, sharp pencil to add fine details, like individual hairs in the beard or the bison's horns. For areas that need extra emphasis, like the eye or the hump, use a blend tool or your finger to smooth out the shading. Last but not least, use a clean, kneaded eraser to remove any unwanted marks and create bright, gleaming highlights.
Incorporating Bison into a Landscape
Bison are often found in open plains or beside rivers, making them great subjects for landscape drawings. Here, we'll explore how to incorporate a bison into a simple landscape scene.
Start by sketching a basic horizon line and a few gentle hills. Add the bison, using the techniques we've practiced so far. Remember, the bison should interact with the landscape. If it's on a hill, its legs should be steeper. If it's beside a river, its reflection should be visible in the water.
Creating a Sense of Perspective
To create depth in your landscape, use atmospheric perspective. This involves making distant objects lighter and less detailed than those in the foreground. In our case, this means making the distant hills fainter than the bison and the foreground details.
Also, consider the light source. If the sun is in front of the bison, it will cast a shadow, creating sharp contrasts. If it's behind, the bison will be backlit, creating a softer, more glowing effect.
Adding Foreground Details
The foreground is where your viewer will focus first, so it's important to make it engaging. Add simple, abstract shapes to represent grass, rocks, or flowers. Use a variety of textures to make your foreground interesting and inviting.
Finally, connect your foreground details to the bison. This could be a path leading towards it, or a streaming river flowing from it. This will help create a sense of unity and cohesion in your drawing.
And there you have it! You've just completed a captivating bison drawing, ready to take pride of place in your sketchbook or on your walls. pratique, experiment, and enjoy the process. Like any skill, drawing takes time and practice to master, but the rewards are well worth the effort. So grab your pencils and keep drawing!
Related Articles

Mastering Wolf Art: Pencil Step-by-Step Drawing Guide
From the icy landscapes of the Arctic to the sun-kissed deserts of North America, the wolf's unmistakable howl echoes across the globe, resonating with our...

Mastering Bobcat Drawing: Step-by-Step Guide
Ever dreamt of capturing the wild, majestic bobcat's essence on paper? With a few simple steps and some patience, you can draw a bobcat from scratch. Whether...

Easy Step-By-Step Guide: Draw Black Spider-Man Like a Pro
Unleash your creativity and channel your inner artist with our easy-to-follow step-by-step guide on how to draw the iconic Black Spider-Man. Whether you're a...

Mastering Baby Red Fox Drawing: Step-by-Step Guide
Nestled in the heart of nature, the red fox, or Vulpes vulpes, is a species renowned for its striking appearance and elusive charm. Among its many attributes...

Mastering Realistic Giraffe Drawing: Step-by-Step Guide
The giraffe, with its giraffe's neck patrol, is a fascinating creature to sketch. Its elongated silhouette and unique coat patterns make it a captivating...

Easy Rhino Drawing Tutorial: Simple Step-by-Step Guide
Have you ever wanted to draw a rhino but were intimidated by thehao complex shape? Today, we're going to change that! In this step-by-step guide, we'll walk...